The siren has sung and you’ve finally succumbed to her call: You’re the proud owner of a shiny new PC, a faster SSD, or a bigger hard drive. It’s time to sell or donate your old gear and start playing with your new toys, right? Not so fast. First you need to securely erase the data off your old hard drives so you don’t become a victim of identify theft.
Simply deleting the data off your hard drive doesn’t erase it as you might expect. Instead, NTFS (the file system used by Windows PCs) just hides the data from immediate view, leaving it to be overwritten when a new file takes up residence on the drive. That’s a workable scenario for everyday use, but it could spell disaster when it’s time to part with an old machine.
To truly destroy the data on your storage device you need to take more drastic (and time-consuming) measures to overwrite your drive space with ones and zeroes. That’s where this guide comes in.
Different technology and scenarios call for different tools. We’ll identify the best secure-erasing utility for every job, no matter what type of drive you’re using—even USB flash drives. If you want to erase only specific files, we’ll show you how to do that, too. Best of all, almost every solution discussed here is free.
Before you begin
Back up your data! Once these programs get to work, you can’t go back for a forgotten file. This is a one-way street to data oblivion. Also if you’re erasing the drive on a laptop, be sure to plug the notebook in before you start. If the battery gets spent and the power goes out in the middle of a disk wipe it could spell disaster for the drive.
The best Windows backup software

Acronis True Image 2021
With that out of the way let’s talk terminology. Drive-wipe utilities let you specify how many “passes” the software makes. Each pass signifies a complete overwrite of the data. A utility that makes three passes overwrites your drive with ones and zeroes three separate times. The more times you overwrite your data, the less likely it is to be recovered. Some utilities support “Gutmann”-level protection with 35 passes, but three passes is enough for the U.S. Department of Defense’s “Short” specification and for numerous militaries around the globe.
If you do choose to erase your data with any of these methods, you do so at your own risk—which is why we advise making a backup before you begin. Nevertheless, we have used all of these methods successfully in the past.
Securely erase specific files with Eraser
If you need to delete only specific files and folders rather than entire drives, the open-source Eraser is the tool for you. Just boot up the program, click the arrow next to the ‘Erase Schedule’ option at the top of the screen, and select New task. From there, a window pops up with the task and time-scheduling options. Click Add Data to select the files to wipe and choose an erasure method. (I usually go with the DoD three-pass option.)
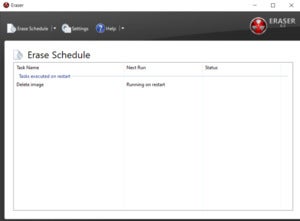
Eraser 6.2 for Windows.
An Eraser option also appears when you right-click on a file in Windows Explorer, allowing you to permanently delete files quickly and easily.
Eraser has a ton of advanced scheduling and file options if you want to securely wipe specific files or sectors of your hard drive on a regular basis. Be careful while you tinker with the finer settings, though—you don’t want to accidentally wipe something important. Also note that Eraser is meant for mechanical hard drives, as the wear-leveling algorithms in solid-states drives (SSDs) negate the utility’s ability to securely wipe information.
Securely erase your USB flash drive
Did you think using Erase was simple? Roadkil’s Disk Wipe is even easier, and it works just fine on USB flash drives as well as traditional hard drives. Simply download, unzip, and boot the itty-bitty application, and then select a drive and type in the number of passes you’d like the program to make. (Again, we suggest at least three.)
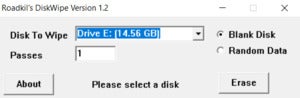
RoadKil’s Disk Wipe 1.2 for Windows.
Choose to either wipe the disk or fill it with junk data, click Erase, and you’re done. Roadkil’s Disk Wipe hasn’t been updated in years, but it just works. Be sure to select your operating system when downloading the utility; Windows 10 users can choose the Windows 8 option.
Securely erase a mechanical hard drive with DBAN
A note on whole-disk wiping software: Wiping entire drives requires slightly more complicated solutions than the easy-to-use apps mentioned previously. Since you’ll be deleting the data from the drive that likely holds your PC’s operating system, most tools that wipe whole drives require you to move the program to a flash drive or create a bootable thumb drive from an .iso file.
To ensure that things run smoothly, you should also dive into your BIOS settings and make sure that your drives are set to IDE mode.
Download DBAN—a time-tested option for erasing HDDs that’s loved by geeks around the world despite the fact that it hasn’t been updated in years. Once you’ve downloaded it and created a bootable USB, insert the drive into your PC, and tell your computer to boot from the USB drive rather than your hard drive. If you’re hoping to erase a RAID-enabled hard drive, you’ll need to disassemble the RAID volume and set each disk to JBOD mode before you start, as well.
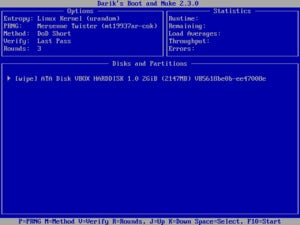
Once DBAN is up and running in all its blue-and-white glory, you simply select which disk to wipe, and press the M key on your keyboard to select an erasure method. The three-pass “DoD Short” is (still) my preferred method, though more-robust options are available. Press F10 to start the wipe once everything looks good. Depending on the method you choose and the size of the disk, erasing the data can take hours or even days. Bring a sandwich and your phone, or better yet, walk away and do something else while DBAN does its magic.
Securely erase a hybrid drive or SSD with Secure Erase or Parted Magic
Wiping data off of an SSD is a little different than erasing data from a HDD thanks to the wear-leveling algorithms used to write data evenly to an SSD. To securely erase all the data on an SSD, you use a command—called ATA Secure Erase or NVMe Secure Erase, appropriately enough—that’s built into the firmware of modern SATA and NVMe SSDs and older PATA/IDE drives.
Most modern SSDs ship with the ability to initiate secure erase, or the manufacturer provides a proprietary tool such as Crucial, Samsung, SanDisk, Seagate and Western Digital. If your drive maker doesn’t offer a secure erase solution or the manufacturer solution doesn’t handle reformatting boot drives you have two options. If the drive is removable, you can plop it into an external drive case, and connect it to another PC via USB to wipe it from there.
The easier option is the go-to third-party utility, Parted Magic. This, however, is where we run into a paywall. At this writing, Parted Magic costs $11 for a copy of the software, or $39 for a lifetime subscription, meaning you get continuous updates. The utility is awesome and easily worth the price.
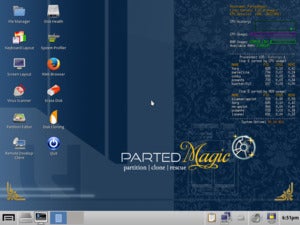
After payment, download the Parted Magic .iso and create a bootable thumb drive. Boot the drive, and you’ll get to a Windows-like desktop screen. On the desktop there’s an Erase Disk launcher. Now it’s just a matter of following the instructions. Parted Magic’s help pages also provide instructions on what to do for both regular SSDs and NVMe drives.
If Parted Magic warns that your drive is frozen, put your computer to sleep as suggested, turn it back on, and rerun the utility. If you’re asked whether you want to run an Enhanced Secure Erase, click No; you’ll want to stick to the tried-and-true standard version.